


Okay... before we begin... this is my first attempt at restoring a machine, and my first attempt at writing any kind of How I Did It post. So all the usual disclaimers apply: your machine may be different than mine, you may have better or worse skills than I do, you may have a better idea than mine... it's all good.
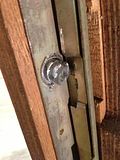
I wanted the useless (neutered, keyless) lock off the front of my Sankyo cabinet. Everybody who saw it said "Do you have the key?" No, I didn't have the key, and even if I did, it didn't turn anything. So I wanted to remove it.
The way I went about it wasn't pretty or sophisticated or gentle. But I did it. The lock is removed and the spring latches still work. Here's how I did it.
TOOLS
Rotary tool (Dremel or equivalent)
Reinforced cutting wheel (typically black)
Cone-shaped grinding tip (red grit)
Philips #0 screwdriver
Big-ass flat-blade screwdriver
Pliers/open-end wrench
Wood blocks, all the same thickness - scrap 2x4 chunks in my case
A hammer(!)
Step 1: Remove the entire front panel
Using your big-ass flat blade screwdriver, remove the top hinge plate. It's a hefty piece of bent steel that wraps around the top corner and forms the top-left hinge of your cabinet (as seen from the front). The screws are long and held in with nuts. Use a pair of slip-joint pliers or appropriate wrench to hold the nut while you remove the screws.
Carefully disengage the cabinet lock latch. You will now be able to lift the entire "machine" out of its wooden frame. This is just like removing an ordinary door from a door jamb. The bottom hinge pin stays attached to the frame, the top pin comes away with the big plate we just removed.
Lay the entire panel face-down on your work surface, placing wood blocks at the corners. This keeps the panel level and keeps any of the front components elevated above the work surface.
Step 2: Latch removal, Part One
The latching mechanism as seen from the inside (left side when looking at the back). The latch plates run the entire height of the machine. The upright (right-angled) portion is spring-loaded and slides up and down. It engages a pair of prongs, one at the top and one at the bottom. There's a slot in the middle where the lock used to engage - turn the lock, and the slide moves up and opens the machine.
- Remove all the screws holding the latch plate to the frame (#0 Philips, roughly 12 total)
- Remove the two springs so the sliding latch section moves freely
Step 3: Lock removal, Part One
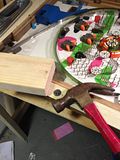
As you can see in picture two, I'd already used my rotary tool and cutting wheel to cut off a good portion of the lock cylinder. It formerly had a teardrop-shaped brass plate at the end (I missed getting a picture of it).
WARNING: Wear eye protection. Pay attention. This part is dangerous. If a reinforced Dremel wheel can cut off a lock cylinder, it'll do the same to your fingers.
It may take a couple of tries, but try to cut off the cylinder as flush as possible. Work only from the outside, and don't let the cutting wheel damage the sliding half of the latch.
Step 4: Latch removal, Part Two
Look closely at picture two. After taking out the screws, the only thing holding the latches in place is the lock itself. You might be able to wiggle it slightly from either end - you'll see that the "hold point" is the lock.
The latch is "stamped" onto the lock with a thin ring of metal bent over the cylinder. Again, you'll see it in picture #2. This ring is the enemy.
- Use your cone-shaped grinding attachment to carefully grind away the ring. Move the sliding portion up and down to avoid damaging it.
DID I MENTION WEARING EYE PROTECTION? A dust mask isn't a bad idea either.
This is going to take some time, so don't rush. Carefully work away at that ring. Check your progress by trying to turn or flex the latch plate. As you work away at the ring, it'll get looser and looser. Once you get enough of it removed, you'll be able to gently flex the plate and it'll pop off the lock cylinder:
Bingo. Latch removed, more-or-less intact, lock remains behind. The spring section will still operate; it just needs to be screwed back on (just not yet).
Lock Removal, Part Two
Flip the panel over. I haven't mentioned this yet, but I'm going to assume you've fully removed the aluminum/steel frame and the plexiglass panel. Get one of your wood blocks and your hammer.
Place the block onto the protruding lock cylinder. Give it a couple of gentle whacks with your hammer. You don't need a serial-killer swing, just a few good, solid bangs. The cylinder will be pushed backwards through the cabinet until flush with the front. (The wood block ensures you don't damage the cabinet and distributes the force. See? I did learn something from reading those locksmithing books.)
Now that the lock is flush with the front panel, use your big-ass flat-blade screwdriver and hammer to finish pushing it through. A few more taps, and it'll pop out the bottom.
Take your mangled but removed Sankyo lock cylinder and put it on your workshop trophy shelf. You earned it.
What comes next?
I plan to replace it with a modern tubular pin tumbler lock (like on a vending machine) - assuming I can get the lock lever to engage the spring-loaded latches. If not, I'll build an unlock latch near the back of the cabinet and replace the lock hole with a power button, a Japanese "good luck" symbol, or something. But that comes later.


 Reply With Quote
 ---------->


